Working environments
Main Page >> GitLab server >> 4. Working environments
Working environments
There are several ways to interact with Git and GitHub.
Command line
Everything covered on this page works just fine from the command line. Again here is a reminder of the various ways you can run Git commands:
- [Windows] Run "Git Bash", a Git client installed in all MI labs
- [Windows] SSH into mi-linux.wlv.ac.uk using an SSH client such as Putty
- [Linux] Boot under Linux, and open a Shell window.
GitLab web interface
Once a repository is created and pushed by 1 user (from the commands line), any further work can take place from GitLab's web interface ("Files" tab). Users can :
- Edit exiting files and commit changes
- Add new files
The web-based text editor is rather simplistic compared to dedicated editors and IDEs, but is sufficient in a lot of cases.
Using GitLab from Eclipse
Many of you are used to working with the Eclipse IDE. This can be used with our GitLab server obviously, via the "Team" menu.
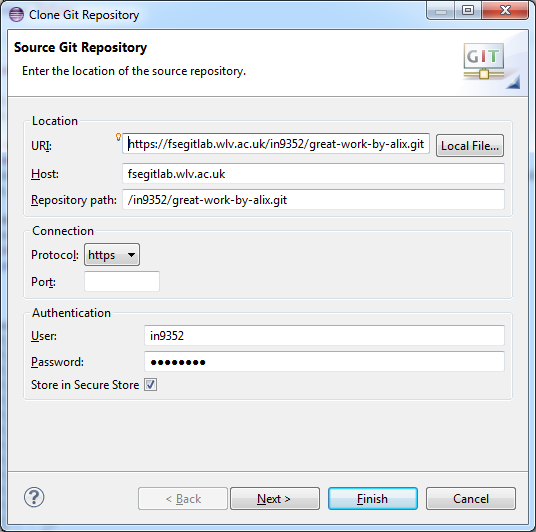
Clone Git Repository
First, let's see how we can clone an existing repository through Eclipse:
- Copy your Git Project HTTPS URL (see earlier)
- In Eclipse, make sure that you have the "Git Repositories" view available
- Go to Window --> Show View --> Other
- Click on Git --> Git Repositories
- Now in the Git window, click on "Clone a Git repository". Your copied Git repository will auto-fill
- Type your username and password. Choose "Store in Secure Store". Click Next, and then Next again
- Click Finish, and wait a few seconds for Eclipse to bring-in the Gitlab project. Your project will show under "Git Repositories" section.
Import project
Your project should now be showing under the "Git Repositories" section, but you still need to manually import it to your list of projects. To do so:
- In the "Git Repositories" section, right click on your repository
- Choose "Imports Projects" from the menu
- On the next window, select "Import as general project" and press "Next"
- On the next window, specify a project name (or accept the default one) and press "Finish".
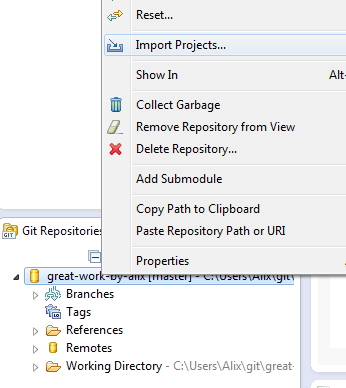
Your project should now be showing in your usual "Package Explorer" window, alongside your other projects.
Pulling and pushing
You will find the usual git commands (pull, push etc.) under the "Team" menu, when right clicking on your project or on your files. Happy Giting!

Git from home
There are plenty of Git clients freely available for all major OS, see a list here:
Working via SSH
An SSH key allows you to establish a secure connection between your computer and GitLab.
To generate a new SSH key, just open your terminal and use code below. The ssh-keygen command prompts you for a location and filename to store the key pair and for a password. When prompted for the location and filename, you can press enter to use the default.
It is a best practice to use a password for an SSH key, but it is not required and you can skip creating a password by pressing enter. Note that the password you choose here can't be altered or retrieved.
ssh-keygen -t rsa -C "$your_email"
Here is an extract of me running the command:
in9352@csl-student:~$ ssh-keygen -t rsa -C "$alix.bergeret@wlv.ac.uk"
Generating public/private rsa key pair.
Enter file in which to save the key (/home/staff/acad/in9352/.ssh/id_rsa):
Created directory '/home/staff/acad/in9352/.ssh'.
Enter passphrase (empty for no passphrase):
Enter same passphrase again:
Your identification has been saved in /home/staff/acad/in9352/.ssh/id_rsa.
Your public key has been saved in /home/staff/acad/in9352/.ssh/id_rsa.pub.
The key fingerprint is:
04:26:cc:e8:16:2d:2a:a3:a9:91:fa:c5:39:9e:42:81 .bergeret@wlv.ac.uk
The key's randomart image is:
+--[ RSA 2048]----+
|   =. o          |
|  + +o .         |
| + o    .        |
|E +    .         |
|o= .    S        |
|= .. .           |
|oo  =            |
|o .o o           |
| ...o            |
+-----------------+
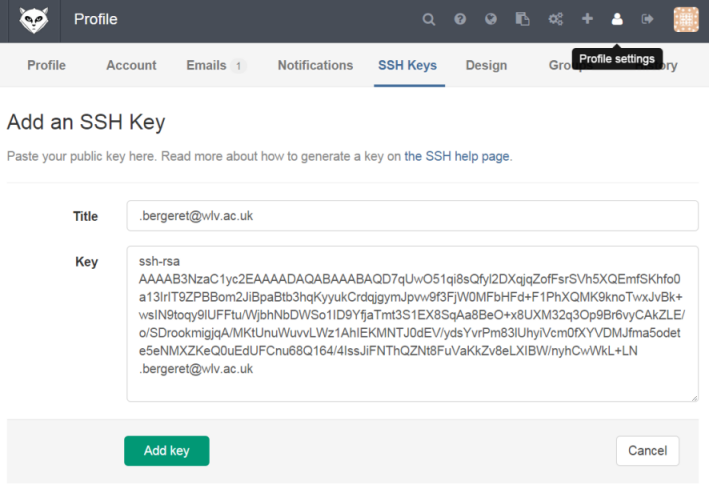
Use the code below to show your public key.
cat ~/.ssh/id_rsa.pub
This is what this command produces for me:
ssh-rsa AAAAB3NzaC1yc2EAAAADAQABAAABAQD7qUwO51qi8sQfyl2DXqjqZofFsrSVh5XQEmfSKhfo0a13IrIT9ZPBBom2JiBpaBtb3hqKyyukCr
dqjgymJpvw9f3FjW0MFbHFd+F1PhXQMK9knoTwxJvBk+wsIN9toqy9lUFFtu/WjbhNbDWSo1ID9YfjaTmt3S1EX8SqAa8BeO+x8UXM32q3Op9Br6vy
CAkZLE/o/SDrookmigjqA/MKtUnuWuvvLWz1AhIEKMNTJ0dEV/ydsYvrPm83lUhyiVcm0fXYVDMJfma5odete5eNMXZKeQ0uEdUFCnu68Q164/4Iss
JiFNThQZNt8FuVaKkZv8eLXIBW/nyhCwWkL+LN .bergeret@wlv.ac.uk
Go back to GitLab, copy-paste the key to the 'My SSH Keys' section under the 'SSH' tab in your user profile. Please copy the complete key starting with ssh- and ending with your username and host.
You should now be able to push to your SSH repository address. You might get this warning the first time around:
The authenticity of host 'fsegitlab.wlv.ac.uk (134.220.4.13)' can't be established.
Are you sure you want to continue connecting (yes/no)? yes
Warning: Permanently added 'fsegitlab.wlv.ac.uk,134.220.4.13' (ECDSA) to the list of known hosts.
- For more information: GitLab documentation on SSH keys