Difference between revisions of "GitLab server"
| Line 447: | Line 447: | ||
</pre> | </pre> | ||
| − | + | Go back to [https://fsegitlab.wlv.ac.uk GitLab], copy-paste the key to the 'My SSH Keys' section under the 'SSH' tab in your '''user profile'''. Please copy the complete key starting with ssh- and ending with your username and host. | |
https://mi-linux.wlv.ac.uk/wiki-images/gitlab13.png | https://mi-linux.wlv.ac.uk/wiki-images/gitlab13.png | ||
Revision as of 17:08, 16 February 2015
GitLab server
The University provides every student with a Git Version Control system called GitLab:
Important: Please note that you should only use this server to store files related to University coursework. Personal or work-related files should not be stored on this server.
This tutorial only acts as an introduction, please refer to the following resources for more information and further reading:
Signing in
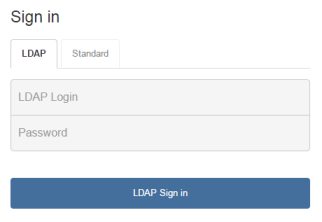
You can sign in using your usual university credentials. Make sure that you select the "LDAP" tab on the "Sign in" screen:
Creating a project
Your next step is to create a "Project" that will contain your work. Click on the "+ New Project" button.

And populate the following fields:
- Project Name
- Description
- Visibility Level
Important: The Visibility Level should be set to "Private" for all assessment-related work. Any other Visibility Level would allow other students to look at and clone your work, which equates to Collusion under the University's Academic Misconduct regulations.
Set the Project's Visibility level to "Private" and then manually invite new project members, via the Project's settings:

Creating your first repository
When visiting your project's homepage you are presented with some Git commands that you should run to create your first repository. Please note that you get 2 access options:
- SSH
- HTTPS
We'll look that HTTPS for now, so click on the "HTTPS" button near the top.
Git commands
Your project's homepage should contain commands similars to these ones.
Please use your own details, these are mine, and only included here as an example!
Git global setup
git config --global user.name "in9352"
git config --global user.email "alix.bergeret@wlv.ac.uk"
Create a new repository
mkdir great-work-by-alix
cd great-work-by-alix
git init
touch README.md
git add README.md
git commit -m "first commit"
git remote add origin git@fsegitlab.wlv.ac.uk:in9352/great-work-by-alix.git
git push -u origin master
Push an existing Git repository
cd existing_git_repo
git remote add origin https://fsegitlab.wlv.ac.uk/in9352/great-work-by-alix.git
git push -u origin master
In order to run the code above you have 3 options:
- [Windows] Run "Git Bash", a Git client installed in all MI labs
- [Windows] SSH into mi-linux.wlv.ac.uk using an SSH client such as Putty
- [Linux] Boot under Linux, and open a Shell window.
Git commands - details
Let's look at each command in more details:
git config --global user.name "in9352"
git config --global user.email "alix.bergeret@wlv.ac.uk"
The commands above simply set some global settings (your user name and email address) that are required for this process.
If you omit these you will get the following warning later on:
- "Your name and email address were configured automatically based on your username and hostname. Please check that they are accurate. You can suppress this message by setting them explicitly."
mkdir great-work-by-alix
cd great-work-by-alix
Well, nothing too difficult here, we simply create an empty folder and move into it. Note that you may wish to move into an existing folder that already contains files instead!
git init
Here is the first important command. git init creates an empty Git repository (on your local system). If the command is successful you should get a message stating "Initialized empty Git repository in ...". This has created a hidden ".git" folder that you can see by running the command "ls -la".
touch README.md
This command simply creates an empty test file called "README.md". If you already have files in your folder (e.g. PHP files), then you don't need to do this.
git add README.md
Second important command. git add adds a file to the repository's index. We can run this command to add our dummy "README.md" file, or any existing files you may have.
git commit -m "first commit"
Third important command! git commit records all changes to the local repository. This should be run regularly when your code is in a working, stable state.
Important: for now your changes were only committing to the local repository. To commit them to the central repository you'll need the "push" command below.
Note: It is always considered good practice to include notes and comments when committing code to a repository, so that other developers can read about your update. When using the command line this is done using the -m argument, as demonstrated above.
git remote add origin https://fsegitlab.wlv.ac.uk/in9352/great-work-by-alix.git
This is an optional command that create a "remote", aka an alias (or shortcut) to your lengthy repository's full address. In this case we name it "origin". So from now on we can simply refer to "origin" when working with this repository (see below!)
Note: your repository's address should contain "https://". If it doesn't then your forgot to press the "HTTPS" button earlier.
git push -u origin master
And here is the final important command! git push commits all local changes to the central repository, i.e. "origin", definied in the previous step.
The second parameter is the "branch" you want to commit to. In this case we create a default branch called "master". We'll worry about branches later.
Important: for now you will need to retype your login and password every time you want to push changes to the central repository. We'll get around this later using the SSH method instead of HTTPS.
Has it worked?
If you go back to GitLab (in your browser) and refresh your project's homepage you should now see something similar to this:
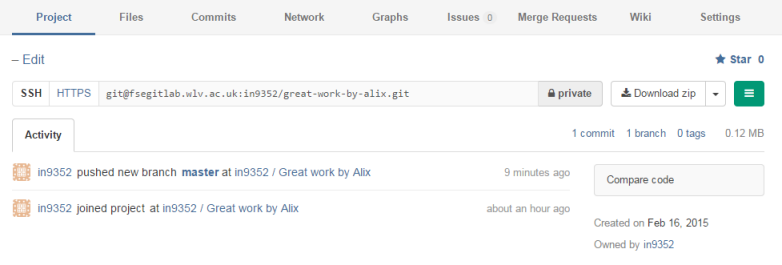
We can see 1 commit to our new branch "master". If you click on the "Files" tab at the top you will see the files you pushed earlier. In my case I pushed a file called "index.html":

Summary of important commands
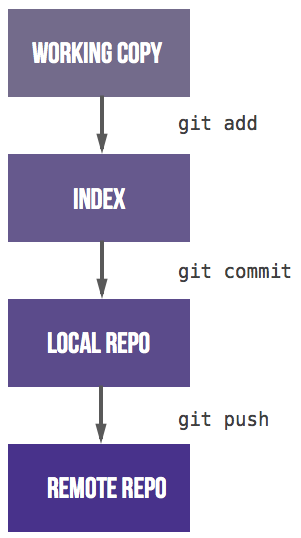
Whether you use an old fashion command line Git Client or a fancy IDE, it is crucial to understand the process and the various steps required when working with git:
- git init: Creates an empty Git repository
- git add: Adds a file to the repository's index
- git commit: Commits changes to local repository
- git push: Commits changes to remote repository
Importing from repository
So far we have explained how to commit (i.e. push) changes from your local repository to the central repository. But what about the other way around? There are 2 git commands for this:
- git-pull: Pulls a copy of a project from a Git repository server to the local file system and synchronize between the two. Note that in order to pull (or push) a project, you must have either created the project (e.g., using the git init command), or cloned the project (e.g., using the git clone command, see below).
- git-clone: Creates a copy of a project on your local file system. You can use this command to "import" a project from Gitlab that was not originally created by you (e.g., by your teammates.)
Cloning
If other team members wishes to work on the repository you created earlier then they will need to "clone" it first:
git clone https://fsegitlab.wlv.ac.uk/in9352/great-work-by-alix.git
The command above:
- creates a new folder
- creates the local repository
- imports all the files from the server to the local repository
You are essentially creating a duplicate working copy of the project.
You might make a change to an existing file, or even add new files:
gedit index.html // make a change to the file and save

touch page2.html
git add page2.htm
git commit -m "Commit by team member"
git push -u origin master
The commands above allow you to:
- make a change to the existing "index.html" file
- create a new "page2.html" file (empty for now) and commit it locally
- push all changes back to the server
Pulling
If you already have a local copy of a repository (you either created it in the first place, or cloned it earlier), and only need to "pull" the latest changes from your team, then you'll need the "git pull" command:
git pull origin
Note: we are reusing the alias we created earlier ("origin"), which is a shortcut for our repository's URL.
The command above will import all new files, as well as existing files that have been updated, into your local repository.
Working as a team
Once all developers have a local copy of your repository, it's a case of simple pulling and pushing changes to and from the central repository.
Solving conflicts
But what happens if 2 developers push a change to the same file? Well, let's take a look.
Let's imagine that our previously created file "page2.html" contains the following, very simple HTML code:
<!DOCTYPE html>
<html>
  <head>
    <meta charset="UTF-8">
    <title>My second page</title>
  </head>
  <body>
    <h1>This is our second page</h1>
  </body>
</html>
Two developers make a change
Let's imagine that 2 developers "pull" the latest code above, and then both make a slightly different change, as follow (see added paragraph):
Developer 1:
<!DOCTYPE html>
<html>
  <head>
    <meta charset="UTF-8">
    <title>My second page</title>
  </head>
  <body>
    <h1>This is our second page</h1>
    <p>Some text about something</p>
  </body>
</html>
Developer 2:
<!DOCTYPE html>
<html>
  <head>
    <meta charset="UTF-8">
    <title>My second page</title>
  </head>
  <body>
    <h1>This is our second page</h1>
    <p>Some other text about something else!</p>
  </body>
</html>
Two developers push their changes
Developer 1 commits his change successfully:
git add page2.html
git commit -m "commit by team member 1"
git push -u origin master
Message displayed:
1 file changed, 1 insertion(+)
Then developer 2 tries to commit too:
git add page2.html
git commit -m "commit by team member 2"
git push -u origin master
But he gets an error message:
error: failed to push some refs to 'https://fsegitlab.wlv.ac.uk/in9352/great-work-by-alix.git'
To prevent you from losing history, non-fast-forward updates were rejected
Merge the remote changes (e.g. 'git pull') before pushing again.
The Git server tells developer 2 to "pull" the latest code again (which will include the change made by developer 1). Let's do that.
Resolving the conflict
Let's pull the code again:
git pull origin
This time a warning message tells us:
CONFLICT (content): Merge conflict in page2.html
Automatic merge failed; fix conflicts and then commit the result.
Indeed when reopening his local copy of "page2.html", developer 2 is presented with the following:
<!DOCTYPE html>
<html>
  <head>
    <meta charset="UTF-8">
    <title>My second page</title>
  </head>
  <body>
    <h1>This is our second page</h1>
<<<<<<< HEAD
    <p>Some other text about something else!</p>
=======
    <p>Some text about something</p>
>>>>>>> 8c409afad98a4a8af4ac0f17a3be594802bc5895
  </body>
</html>
As you can see both changes (i.e. both paragraphs) are included, and highlighted by Git. It is up to developer 2 to decide which one to keep and push back to the server. Here a conversation between the 2 developers should take place, and a decision made (for example, merging the wording of the 2 paragraphs!), before the change can be pushed.
Working environments
There are several ways to interact with Git and GitHub.
Command line
Everything covered on this page works just fine from the command line. Again here is a reminder of the various ways you can run Git commands:
- [Windows] Run "Git Bash", a Git client installed in all MI labs
- [Windows] SSH into mi-linux.wlv.ac.uk using an SSH client such as Putty
- [Linux] Boot under Linux, and open a Shell window.
GitLab web interface
Once a repository is created and pushed by 1 user (from the commands line), any further work can take place from GitLab's web interface ("Files" tab). Users can :
- Edit exiting files and commit changes
- Add new files
The web-based text editor is rather simplistic compared to dedicated editors and IDEs, but is sufficient in a lot of cases.
Using Git from Eclipse
Many of you are used to working with the Eclipse IDE. This can be used with our GitLab server obviously, via the "Team" menu.
Clone Git Repository
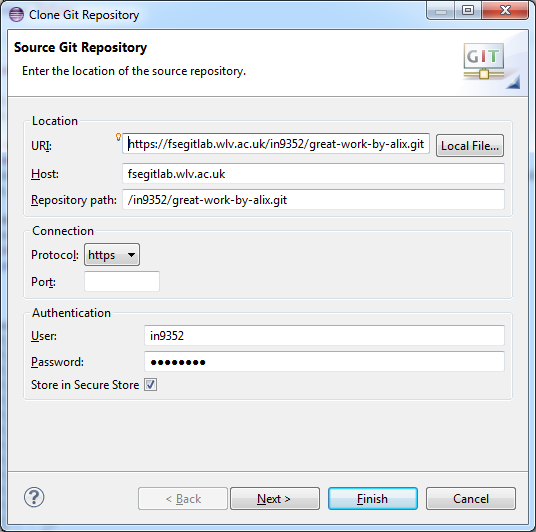
First, let's see how to clone an existing repository through Eclipse:
- Copy your Git Project HTTPS URL (see earlier)
- In Eclipse, make sure that you have the "Git Repositories" view available
- Go to Window --> Show View --> Other
- Click on Git --> Git Repositories
- Now in the Git window, click on "Clone a Git repository". Your copied Git repository will auto-fill
- Type your username and password. Choose "Store in Secure Store". Click Next, and then Next again
- Click Finish, and wait a few seconds for Eclipse to bring-in the Gitlab project. Your project will show under "Git Repositories" section.
Import project
Your project should now be showing under the "Git Repositories" section, but you still need to manually import it to your list of projects. To do so:
- In the "Git Repositories" section, right click on your repository
- Choose "Imports Projects" from the menu
- On the next window, select "Import as general project" and press "Next"
- On the next window, specify a project name (or accept the default one) and press "Finish".
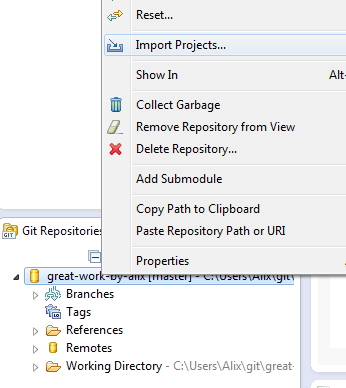
Your project should now be showing in your usual "Package Explorer" window, alongside your other projects.
Pulling and pushing
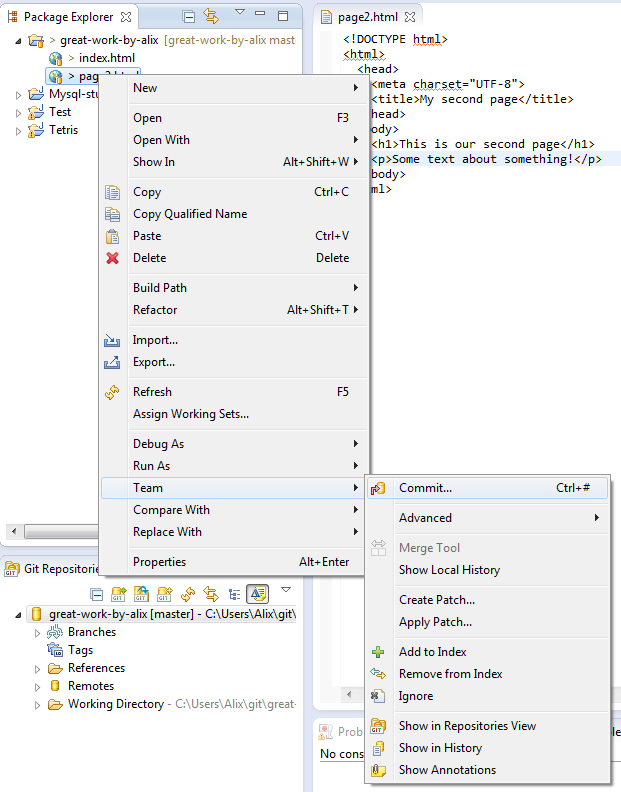
You will find the usual git commands (pull, push etc.) under the "Team" menu, when right clicking on your project or on your files. Happy Giting!
Working via SSH
An SSH key allows you to establish a secure connection between your computer and GitLab.
To generate a new SSH key, just open your terminal and use code below. The ssh-keygen command prompts you for a location and filename to store the key pair and for a password. When prompted for the location and filename, you can press enter to use the default.
It is a best practice to use a password for an SSH key, but it is not required and you can skip creating a password by pressing enter. Note that the password you choose here can't be altered or retrieved.
ssh-keygen -t rsa -C "$your_email"
Here is an extract of me running the command:
in9352@csl-student:~$ ssh-keygen -t rsa -C "$alix.bergeret@wlv.ac.uk"
Generating public/private rsa key pair.
Enter file in which to save the key (/home/staff/acad/in9352/.ssh/id_rsa):
Created directory '/home/staff/acad/in9352/.ssh'.
Enter passphrase (empty for no passphrase):
Enter same passphrase again:
Your identification has been saved in /home/staff/acad/in9352/.ssh/id_rsa.
Your public key has been saved in /home/staff/acad/in9352/.ssh/id_rsa.pub.
The key fingerprint is:
04:26:cc:e8:16:2d:2a:a3:a9:91:fa:c5:39:9e:42:81 .bergeret@wlv.ac.uk
The key's randomart image is:
+--[ RSA 2048]----+
|   =. o          |
|  + +o .         |
| + o    .        |
|E +    .         |
|o= .    S        |
|= .. .           |
|oo  =            |
|o .o o           |
| ...o            |
+-----------------+
Use the code below to show your public key.
cat ~/.ssh/id_rsa.pub
This is what this command produces for me:
ssh-rsa AAAAB3NzaC1yc2EAAAADAQABAAABAQD7qUwO51qi8sQfyl2DXqjqZofFsrSVh5XQEmfSKhfo0a13IrIT9ZPBBom2JiBpaBtb3hqKyyukCr
dqjgymJpvw9f3FjW0MFbHFd+F1PhXQMK9knoTwxJvBk+wsIN9toqy9lUFFtu/WjbhNbDWSo1ID9YfjaTmt3S1EX8SqAa8BeO+x8UXM32q3Op9Br6vy
CAkZLE/o/SDrookmigjqA/MKtUnuWuvvLWz1AhIEKMNTJ0dEV/ydsYvrPm83lUhyiVcm0fXYVDMJfma5odete5eNMXZKeQ0uEdUFCnu68Q164/4Iss
JiFNThQZNt8FuVaKkZv8eLXIBW/nyhCwWkL+LN .bergeret@wlv.ac.uk
Go back to GitLab, copy-paste the key to the 'My SSH Keys' section under the 'SSH' tab in your user profile. Please copy the complete key starting with ssh- and ending with your username and host.
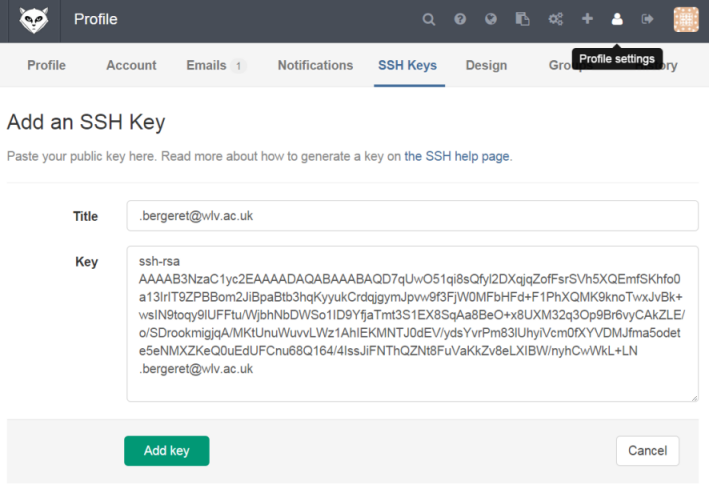
You should now be able to push to your SSH repository address. You might get this warning the first time around:
The authenticity of host 'fsegitlab.wlv.ac.uk (134.220.4.13)' can't be established.
Are you sure you want to continue connecting (yes/no)? yes
Warning: Permanently added 'fsegitlab.wlv.ac.uk,134.220.4.13' (ECDSA) to the list of known hosts.
- For more information: GitLab documentation on SSH keys